7 Tips Where to Apply Blush for a Lifted Look?

Time:2026-10-20 Author:Charlotte
0%

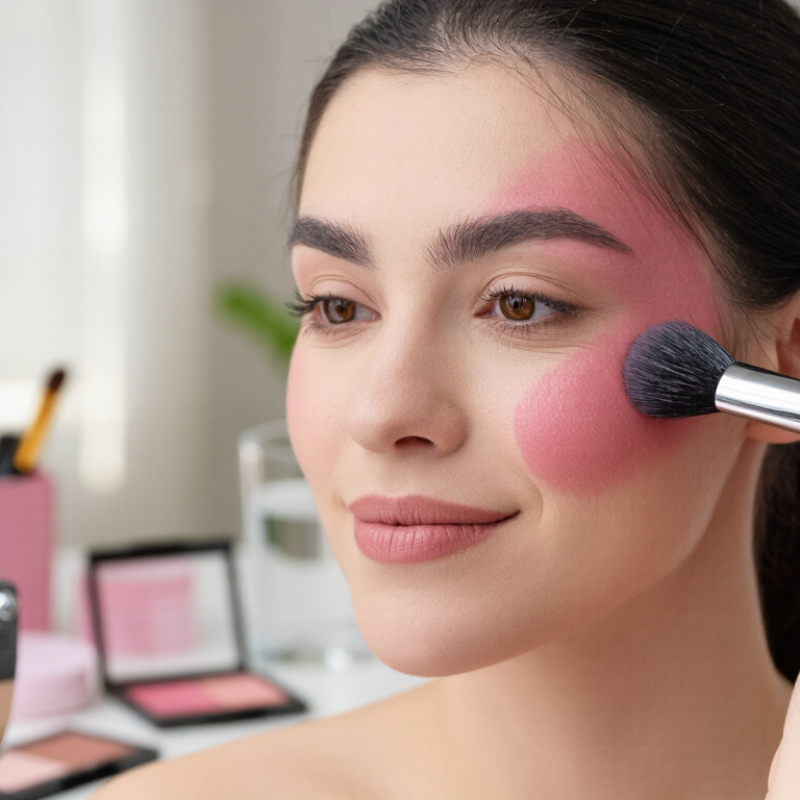
A lifted blush placement can subtly reshape the face without looking heavily sculpted. The key is learning where to apply blush for a lifted look, then adjusting the placement to suit your features. Instead of sweeping color across the center of the cheeks, many makeup artists begin slightly higher and farther back. This creates a gentle diagonal toward the temples.

Small changes matter. A soft rose shade can warm fair skin, while terracotta or berry tones may complement deeper complexions beautifully. However, color alone does not create lift. Texture, blending, brush size, and pressure all influence the final result. Cream blush often melts into fresh skin, while powder formulas can provide more lasting definition. Both can work well.

This guide shares seven practical tips based on professional makeup techniques and everyday application experience. You will see how cheekbone structure, face shape, and lighting affect placement. A mirror at eye level helps reveal whether the blush sits too low. Natural window light helps prevent over-application.

Keep the finish believable. Very high placement can look harsh, especially on textured skin. I have also found that stopping too early can leave the cheeks disconnected from the rest of the makeup. There is no single perfect map for every face. Your best placement may need small adjustments, and that is worth remembering. The goal is fresh, balanced color that supports your features rather than covering them.
7 Tips Where to Apply Blush for a Lifted Look?

Map Seven Blush Zones Against Cheekbone Anatomy for a Lifted Effect

7 Tips Where to Apply Blush for a Lifted Look

A lifted blush placement begins with the cheekbone, not the cheek’s roundest point. Feel for the zygomatic bone beneath the outer eye. Its highest area is the malar prominence, where color can create natural height.

Zone one is the upper apple, slightly above the cheek’s fullest curve.
Zone two follows the front half of the cheekbone.
Zone three sits directly over the malar prominence.
Zone four extends along the upper zygomatic arch, moving outward.
Zone five reaches the outer cheek near the hairline.
Zone six lightly connects the cheekbone to the temple.
Zone seven belongs high on the temple, where the forehead meets the side of the face.

Keep each zone softly connected, not sharply striped. Very little color.

I usually place the strongest pigment in zones three and four, then blend outward through zones five and six. This follows the bone’s natural diagonal and visually raises the cheek. Avoid dragging blush below the nose or toward the mouth, because those directions can make the face appear heavier. Leave a narrow space beneath the outer eye for a cleaner lift.

A small brush gives better control around the zygomatic arch, while fingers can soften dry-looking edges.

I once placed too much color near the temple, and the result looked bruised rather than elevated. That mistake still matters.

Adjust for face shape, lighting, skin texture, and personal comfort. Clean tools and a small patch test remain sensible precautions, especially for sensitive skin.

Select Undertones Using CIE L*a*b* Color Principles and Fitzpatrick Skin Types

A lifted blush look starts with undertone analysis, not guesswork. CIE L*a*b* describes color through lightness, red-green balance, and yellow-blue balance. L* measures brightness; a* tracks green to red; b* tracks blue to yellow. Fitzpatrick skin types describe sun response, not exact undertones. Type I or II skin may appear cool, neutral, or olive. Types III to VI can also show varied undertones. Test blush on the cheek, not the wrist.

  1. Place the highest color on the upper cheekbone.
  2. Sweep softly toward the temple.
  3. Keep the center of the face lighter.
  4. Use cool rose when a* appears strongly red.
  5. Try peach when b* shows a warm yellow balance.
  6. Choose muted terracotta for deeper, olive-leaning complexions.
  7. Add a tiny amount across the nose for believable warmth.

Use daylight or a neutral LED light. Pink bathroom bulbs distort a* and b* readings. A professional colorimeter is more reliable than visual comparison, although makeup texture still changes the result. The system is useful, not flawless. I would reassess after foundation, because its opacity can shift perceived lightness.

McKinsey’s State of Fashion: Beauty 2023 projects the global beauty market may approach 580 billion dollars by 2027, with about 6% annual growth. That expansion supports more shade experimentation, but trends should not replace measurement. Apply one thin layer, wait five minutes, and inspect the cheek from several angles. A slightly imperfect match often looks more natural than an overly bright stripe.

Place the First Layer Above the Cheek’s Apple, Then Angle Upward

For a lifted blush effect, place the first layer slightly above the cheek’s apple. The apple is the rounded area that appears when you smile. Starting too low can pull the face downward visually. I use a small amount near the upper cheek, then blend toward the temple in a soft, angled path.

Keep the color closer to the outer half of the cheek than the nose. This placement creates space around the center of the face. Use light pressure, especially with highly pigmented formulas. A dense brush can deposit too much color quickly, so tap off excess before touching the skin. Build slowly. You can always add more.

I check the result in natural daylight because indoor lighting can hide uneven edges. The blush should fade gradually, not stop in a visible stripe. If the angle looks harsh, I soften it with a clean brush and a tiny amount of complexion product. I still sometimes place blush too high, particularly when rushing. That mistake reminds me to pause and compare both sides. Clean tools also matter; regularly washing brushes helps reduce the buildup of oil, makeup, and residue. Anyone with sensitive skin should check the product’s ingredient list and stop using it if burning or persistent irritation appears. A lifted look depends less on a dramatic stripe than on careful placement, thin layers, and patient blending.

Blend Two Sheer Layers While Preserving a Soft, Elevated Outer Edge

For a lifted blush placement, start on the upper cheekbone, slightly outside the center of the face. Keep the color away from the lowest part of the cheek. Add a sheer touch to the outer apple, then sweep toward the temple. The temple creates continuity. A small amount near the hairline can soften the transition. These are four useful placement points.

Use a second, lighter layer instead of one heavy application. The first layer should sit high on the cheekbone. The second can reach the outer apple and temple. Blend inward with a clean, soft brush, but stop before the color loses its shape. Keep the outside edge airy and elevated. Do not pull it sharply toward the jaw. That mistake can make the face appear longer.

For balance, tap tiny amounts across the bridge of the nose, chin, and outer jawline. These final three points should look almost accidental. I often use leftover product for them. It prevents harsh color changes. Cream and powder textures may behave differently, so test a small area first. In my experience, pressing works better than repeated sweeping on textured skin. Still, my first placement is not always perfect. I check the result in daylight, then soften only the edges that look obvious. A slightly uneven finish can appear more natural than an overworked one.

7 Tips: Where to Apply Blush for a Lifted Look — Blend Two Sheer Layers While Preserving a Soft, Elevated Outer Edge
Tip Placement Focus How to Apply Lifted-Look Principle
1 Start Above the Center of the Cheek Place the first sheer layer on the upper part of the cheek, slightly above the fullest area that appears when you smile. Use a small amount and blend upward toward the temple. Avoid dragging the color downward. Higher placement visually emphasizes the upper cheek area and helps keep the overall shape from appearing low or heavy.
2 Keep the Soft Outer Edge Elevated Extend the blush diagonally outward and upward, stopping near the outer brow or temple area. Diffuse the perimeter until there is no hard line, while keeping the highest point of the blend above the center of the cheek. The outer edge should look feathered, not sharply angled. A softly lifted diagonal direction creates structure without making the blush look graphic or severe.
3 Build Two Sheer Layers Apply a thin first layer, blend completely, and allow it to settle. Add a second light layer only where more color is needed, concentrating it near the upper cheek and gradually reducing intensity toward the edges. Two light applications offer more control than one heavy deposit. Sheer layering makes it easier to control saturation, maintain transparency, and preserve a natural transition around the cheek.
4 Use the Apples as a Blending Zone If you want freshness, tap a small amount toward the outer portion of the apples, then blend it upward and outward into the main placement. Keep the central nose area and lower cheek relatively clear. Use the apples to soften the look, not to create a round stripe. A controlled touch near the apples adds liveliness while the upward blend prevents the face from looking visually pulled downward.
5 Leave a Clean Buffer Beside the Nose Keep the strongest blush away from the sides of the nose. Blend inward only until the color looks connected, leaving a small area of lower-intensity skin between the nose and the main cheek concentration. The exact distance varies with face shape and personal preference. A clean buffer keeps the color placement open and refined, rather than making the center of the face look congested.
6 Match the Tool to the Desired Diffusion Use a fluffy brush for a broad, airy veil, fingertips for controlled tapping, or a damp sponge for a softer finish. Press and bounce rather than rubbing, especially when applying the second layer. Remove excess product from the tool before touching the face. Light pressure and a clean tool help distribute pigment evenly and protect the soft outer edge from becoming patchy or harsh.
7 Check the Shape at Rest After blending, relax the face and inspect the blush with the eyes open and the head held naturally. If the color sits too low, add a small amount higher on the cheek and diffuse the transition upward. Recheck in natural or neutral lighting when possible. Blush can shift when the cheeks are lifted in a smile. Checking the relaxed face confirms that the finished placement remains elevated.

Check Symmetry in Daylight and Clean Brushes Every 7–10 Days (AAD)

A lifted blush look begins with placement, not pressure. Sweep color from the apple of the cheek toward the upper ear, keeping the strongest pigment slightly higher. This direction can visually raise the face. Use a light hand near the nose. Too much color there may make the complexion look flushed instead of lifted.

Check your symmetry in daylight before adding more product. Bathroom lighting can hide uneven edges and exaggerate shadows. Stand near a window, relax your face, and compare both cheeks from several angles. A phone photograph can help, although cameras sometimes distort facial proportions. I often find one side needs less blending, not more blush. That small correction is easy to miss.

Clean brushes every 7–10 days, as advised by the American Academy of Dermatology. Wash them sooner if they touch irritated skin, heavy cream products, or visible buildup. Use lukewarm water and a gentle cleanser, keeping the handle and metal joint as dry as possible. Rinse until the water runs clear, then reshape the bristles and dry the brush flat. Do not store it damp. A clean brush spreads color more evenly and reduces the transfer of oil, residue, and microorganisms. I sometimes postpone cleaning when my schedule gets crowded. That is a poor habit, especially when the brush feels stiff or smells unusual.

7 Tips for Applying Blush for a Lifted Look

This chart presents a practical seven-step application sequence rather than a clinical ranking. Place blush slightly higher on the cheeks, blend upward toward the temples, check both sides in natural daylight, and clean makeup brushes every 7–10 days, as recommended by the American Academy of Dermatology.

FAQS

How can undertones guide blush selection?

Use color balance, not guesswork. A strong red balance may suit cool rose. A yellow balance may suit peach. Olive complexions often tolerate muted terracotta.

What do the three CIE Lab values describe?

L describes brightness. A tracks green to red. B tracks blue to yellow. These readings guide color decisions, but they are not flawless.

Do skin types predict exact undertones?

No. Sun-response categories do not define undertones precisely. Any skin type may appear cool, neutral, warm, or olive.

Where should blush be tested?

Test it on the cheek, not the wrist. The cheek shows the color against your actual facial skin. Try one thin layer.

Where should the strongest blush color sit?

Place the highest color on the upper cheekbone. Sweep gently toward the temple. Keep the center of the face lighter.

How can two sheer layers create a lifted effect?

Put the first layer high on the cheekbone. Add a lighter second layer toward the outer apple and temple. Keep the outer edge soft.

Which lighting helps evaluate blush accurately?

Use daylight or neutral LED light. Pink bathroom bulbs can distort red and yellow impressions. Inspect your cheek from several angles.

How should blush be adjusted after foundation?

Reassess after foundation. Its opacity can change perceived brightness. Add thin layers, wait five minutes, and soften only obvious edges.

Where can small finishing touches create warmth?

Tap tiny amounts across the nose bridge, chin, and outer jawline. These touches should look nearly accidental. Leftover product works well.

What mistakes can make the placement look less lifted?

Pulling color sharply toward the jaw may lengthen the face visually. Repeated sweeping can disturb textured skin. Pressing may work better, though my first placement is not always right.

Conclusion

Learning where to apply blush for a lifted look starts with understanding your cheekbone structure. Identify seven practical zones across the cheek, including the upper apple, cheekbone ridge, outer cheek, and temple-facing edge. Place the first sheer layer slightly above the fullest part of the cheek rather than directly at its center, then angle the color upward toward the outer cheekbone. This placement visually elongates and elevates the face while keeping the result natural.

Choose blush undertones that complement both your skin’s Fitzpatrick type and its CIE L*a*b* color characteristics, considering lightness, redness, and yellow-blue balance. Build the color gradually with two thin layers, blending inward without erasing the soft, raised outer edge. Finally, check both sides in natural daylight, correcting unevenness before setting the look. Clean brushes every 7–10 days to support more consistent application and better skin hygiene.

Charlotte

Charlotte

Charlotte is a seasoned marketing professional with a deep understanding of the company's portfolio and a passion for elevating its presence in the market. With a keen eye for detail and a commitment to excellence, she ensures that our professional blog is regularly updated with insightful articles......