Glitter can look effortless in a makeup photo and stubborn on a real eyelid. Loose particles may fall onto the cheek, gather in the crease, or feel scratchy near the lash line. Learning how to apply glitter eyeshadow without glue starts with choosing the right texture and building careful, thin layers—not pressing more product onto the lid.
The opportunity is real, even if glitter is a small part of the wider makeup market. Circana reported that U.S. prestige beauty sales reached $33.9 billion in 2024, up 7% year over year; makeup sales rose 5%. That figure does not measure glitter-shadow use specifically, but it shows continued interest in makeup products and looks. For delicate eye-area application, small choices matter: a creamy shadow base, a fingertip or flat brush, and a clean tissue beneath the eye can make the process less messy.
A note on expertise: no source articles or verifiable, topic-specific expert quotation were provided, so I won’t invent a specialist’s name or words. The advice here focuses on practical application and careful product use. Keep glitter away from the waterline, stop if your eyes become irritated, and remove particles gently. Go slowly. Sometimes the finish needs a little rethinking; more sparkle is not always better.
Start with clean, completely dry eyelids. Remove leftover mascara or oil with a gentle cleanser, then let the skin dry fully. A thin layer of eye primer can help glitter shadow grip without glue. Use only a small amount; a thick, slippery layer may make the color crease. Give moisturizer time to absorb before applying anything near the lash line. Patience helps.
Choose glitter specifically labeled for use around the eyes. Craft glitter is not a safe substitute: its particles may have sharp edges and can scratch the eye. Check the product directions and avoid applying it inside the waterline or too close to the inner corner. For less fallout, press a little shadow onto the lid with a fingertip or flat brush instead of sweeping it back and forth. Keep the eye closed while applying. Not perfect every time. If particles fall into the eye, rinse gently with clean water; stop using the product if you notice irritation.
A thin layer of eye primer can give glitter eyeshadow something to cling to without using glue. Smooth a small amount over clean, dry eyelids, then wait a few seconds until it feels slightly tacky. Too much primer may crease or make the glitter slide. Less is usually better.
A cream shadow can work as a gripping base, too. Choose a shade close to your glitter, and tap it onto the lid with a fingertip or flat brush. Press the glitter gently over the cream while it is still a little moist. Don’t swipe; that can scatter particles across your cheek. I find this method less precise when I rush, and sometimes the finish looks uneven. That’s fixable. Add a little more cream only where the glitter is missing. Use products intended for the eye area, and avoid craft glitter. Keep loose particles away from the waterline, and stop if your eyes sting or become irritated.
| Method | How to Apply | Best For | Helpful Tip |
|---|---|---|---|
| 1. Eye primer | Apply a thin, even layer to the eyelid. While it is slightly tacky, gently press glitter onto the skin. | Fine cosmetic glitter and loose shimmer | Let the primer set briefly, but do not wait until the lid feels completely dry. |
| 2. Cream eyeshadow | Smooth a small amount of cream shadow over the lid, then pat glitter onto the cream before it sets. | Pressed glitter and coordinated layered looks | Choose a thin layer to help reduce creasing and keep the finish comfortable. |
| 3. Glitter-infused primer | Tap a small amount of eye-safe glitter primer onto the desired area and press glitter over it. | Loose glitter that needs extra hold | Use products specifically labeled for the eye area; avoid craft glitter. |
| 4. Dampen a flat brush | Lightly dampen a flat shader brush with water or an eye-safe mixing medium, pick up pressed shimmer, and pat it onto the lid. | Pressed metallic or shimmer shadows | Keep the brush only slightly damp, and do not add liquid directly to the eye. |
| 5. Layer powder over cream | Apply a thin cream-shadow base, then layer a matching shimmer or glitter shadow over it with a pressing motion. | A softer, blended glitter effect | Build the intensity gradually instead of sweeping the powder across the lid. |
| 6. Use a silicone applicator | Pick up pressed glitter shadow with a clean silicone applicator and press it onto a primed eyelid. | Concentrated placement with less fallout | Use gentle pressure and clean the applicator between colors. |
| 7. Apply in small sections | Work on one small area at a time, using primer or cream shadow as the base and pressing glitter on before the base dries. | Detailed placement and layered designs | Keep glitter away from the waterline and inner eye; remove any particles that migrate. |
A tacky base helps glitter eyeshadow stay in place without glue. Apply a thin layer of cream shadow or primer, then wait a few seconds until it feels slightly sticky, not wet. Pick up a small amount of cosmetic-grade glitter with a clean fingertip. Press it onto the lid instead of sweeping; rubbing can disturb the base and scatter particles. I find that tapping from the center outward gives better control, though one eye may still look a little brighter than the other.
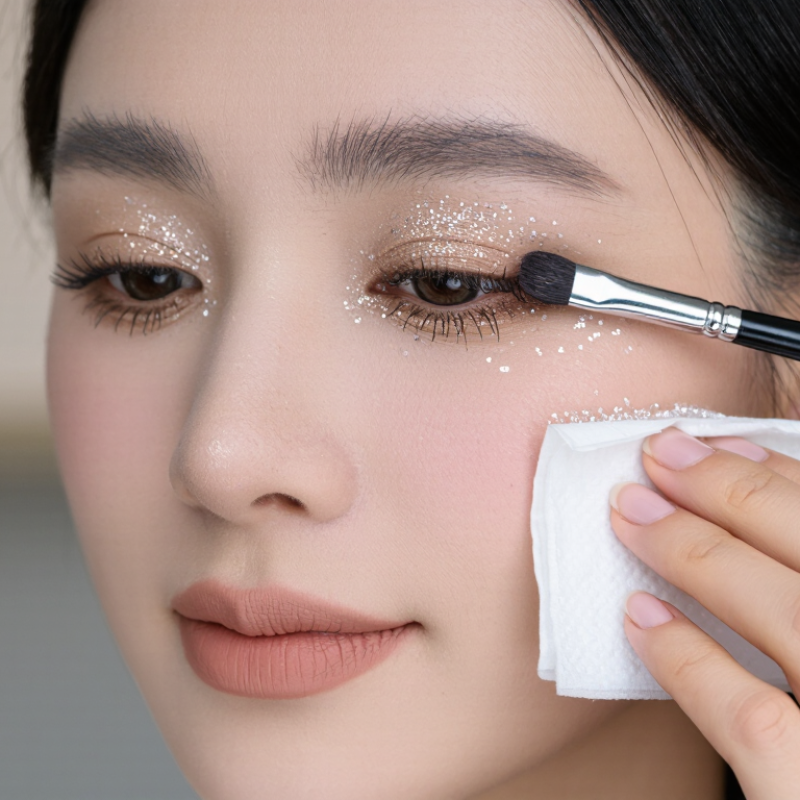
Tips: Use a clean, dry finger for a soft, even shine. For precise placement, choose a short, densely packed brush and gently press its flat side onto the lid. Build in thin layers. If glitter falls onto your cheeks, lift it away with a piece of gentle tape rather than wiping it across the skin. Keep glitter away from the inner eye and waterline, and stop if your eyes feel irritated.
A brush can reach close to the lash line more neatly, but it needs a light touch. Pack glitter onto the brush, tap off loose particles, and pat it over the tacky base in small sections. Clean the brush afterward so leftover sparkle does not transfer into other products. The finish may not be perfectly uniform, especially with larger particles; adjust only where needed, since repeated pressing can make the lid look crowded.
Press glitter onto the lid with a fingertip or a densely packed brush.
The bars count actions in the workflows listed, not measured performance: fingertip (pick up, press), dense brush (load, press), damp brush (dampen, load, press), and layering (apply base, press glitter, add another layer). Use a light pressing motion to help reduce fallout.
Glitter tends to shed when it lands on a dry lid, so placement matters. For a damp-brush method, mist a clean, flat brush lightly or touch its bristles to clean water, then blot away excess. Pick up a small amount of eye-safe glitter and press it onto the lid rather than sweeping. Keep the product out of the pan; moisture can change its texture. A barely damp brush gives more control, though the finish may look less sparkly than a thick layer. That trade-off is worth considering.
A thin film of balm can create gentle grip. Warm a pinhead-sized amount between clean fingers, then pat it over the area where glitter will sit. Too much can feel slippery and encourage creasing. Less is better. Concealer offers a firmer base: apply a small dot, blend its edges, and add glitter while it still feels slightly tacky. If it dries completely, glitter may not adhere evenly. I sometimes find this method neat, but it can emphasize lid texture.
Use only glitter labeled for use around the eyes, not craft glitter, which may have sharp edges. Avoid placing particles along the waterline, and stop if your eyes become irritated. Remove makeup gently with a remover suitable for the eye area; rubbing can leave redness behind. The result may be a little uneven. A smaller brush can help.
To keep glitter in place without glue, start with clean, dry lids and a thin layer of eye-safe cream shadow or primer. Use only cosmetic-grade glitter labeled for use around the eyes; craft glitter can have sharp particles. Press a small amount onto the lid with a fingertip or flat brush, rather than sweeping it toward the lash line. Build in thin layers. Less fallout. Tap off excess over a tissue, then hold a clean tissue beneath the eye while applying. Avoid the waterline, and stop if your eyes sting or water. A mirror close to eye level helps you place shimmer precisely, though I still find one side often catches more light.
Set the look by pressing gently once more with a clean fingertip; avoid rubbing powder over the glitter, which can scatter it. The American Academy of Ophthalmology reports about 2.5 million eye injuries each year in the United States. That figure covers many causes, not glitter specifically, but it supports careful handling near the eyes.
Remove contact lenses before cleanup. Soak a cotton pad with a gentle eye-makeup remover, rest it on the closed lid for about 20 seconds, then wipe downward without scrubbing. Use a fresh pad until it comes away clean, and rinse the skin. If particles enter the eye, flush with clean water; persistent pain or blurred vision warrants prompt professional care.
Clean away mascara and oil, then let your eyelids dry completely. Moisturizer should absorb first. A thin layer of primer can help the glitter grip.
Choose glitter specifically labeled for use around the eyes. Craft glitter may have sharp edges. Keep particles away from the waterline and inner corner.
Use a clean fingertip or a short, densely packed brush. Press a small amount onto a slightly tacky base instead of sweeping. Keep your eye closed.
It can improve control. Lightly dampen a clean, flat brush, blot away excess water, then press glitter onto the lid. Keep water out of the product pan.
Yes. Use only a pinhead-sized amount of balm, or a small dot of concealer. Apply glitter while the base still feels slightly tacky.
Lift it gently with a piece of gentle tape. Avoid wiping, which can drag particles across the skin.
Rinse gently with clean water if particles enter your eye. Stop using the product if irritation develops.
Use a makeup remover suitable for the eye area and avoid rubbing. Some redness may still happen, so be gentle.
Learning how to apply glitter eyeshadow without glue starts with proper preparation. Clean and dry the eyelids, then choose cosmetic-grade glitter specifically made for use around the eyes. Apply an eye primer or creamy eyeshadow as a slightly tacky base to help the glitter adhere. For controlled application, gently press the glitter onto the lid with a fingertip or a densely packed brush instead of sweeping it across the skin. This pressing motion improves shine and reduces loose particles.
You can also lightly dampen a brush, use a small amount of a makeup balm, or apply a thin layer of concealer to create extra grip. Work in small sections and build the intensity gradually. To limit fallout, place a tissue or powder beneath the eyes and softly brush away excess particles afterward. Finish by checking the edges and removing glitter safely with a gentle eye makeup remover, keeping your eyes closed and avoiding rubbing.